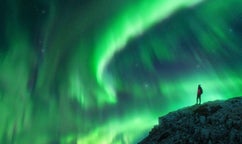
Capturing the northern lights

OK this is a long post so bear with me... It´s for the greater good and I hope karma sends some hugs my way for this...
I've been seeing a lot of tutorials and how to´s on how to photograph the northern lights circulating the internet lately and a lot of them give plain bad advise on how to shoot the lights which does not make it any easier for someone who´s starting photographing the northern lights. The makers of cameras are constantly coming with cameras that are better and better equipped at dealing with low light conditions and that makes it possible to capture better and better photos of the northern lights. I´ve written a book about the subject but to try and counter the nonsense that is flying around, here are the basics:
1. Equipment.
Camera capable of shooting in manual mode. Wide angle lens as the lights tend to spread out over the night sky. Tripod. remote shutter release (you can use a shutter delay if you don´t have a shutter release).
2. Weather and activity.
There are a lot of websites that give you information about the weather forecasts and aurora forecasts but remember that those are forecasts and that there are no guarantees. The lights are measured on the scale of Kp0-9 with 9 being the strongest. The stronger the lights and the Kp value, the closer to the equator you can see them. Local weather websites should give you good ideas about cloud cover and you need clear skies to see the lights. You might also want to check light pollution maps to see where it´s best to go to get away from city lights.
3. Focus.
To get the lights into focus, you have to focus the lens on infinity. To do that, you can either switch to auto-focus and focus on the lights furthest away from you before switching back to manual focus (those lights might be the moon, stars, distant city lights etc.), or you can manually set the focus in which case it can help to use the live view, zoom in on the screen, and get the stars crispy sharp.
4. Settings.
Switch the camera to manual mode, set the aperture to the biggest aperture possible (Lowest f-number that the lens can go down to). Push the ISO as high as you can go without the image becoming to grainy/noisy for your taste (this varies a lot between cameras but most cameras work fine at ISO between 1600-3200). The last setting is the exposure. Now the shorter the exposure, the better you freeze the lights so if they are strong, go for short exposure, if they are weak, go for longer exposure.

There are many other things you can use to better your photos including location scouting, composition, stitching, post processing etc. but I´ll leave that for another day...
I hope this helps someone get on the right track and help get hooked on chasing lady Aurora.
Sincerely
Siggi


Other interesting blogs

Chasing Waterfalls in Iceland
Iceland is spectacular in so many ways and Icelandic nature is quite unique with its vast landscape, volcanic activity, geothermal areas, glacier lagoons and sceneries, black sand beaches and spectRead moreLupines in Iceland: Beauty, Controversy, and Environmental Impact
Iceland’s striking landscapes are known for their stark beauty—volcanic deserts, lava fields, glaciers, and black sand beaches. Among these natural wonders, visitors in summer may notice vast fieldsRead moreSænautasel Turf House in the Highland of Iceland
In my search for turf houses around Iceland, I visited Sænautasel, which is a rebuilt turf house on Jökuldalsheiði heath in the highland of Iceland. It is, in my opinion, an extremely cute turf hoRead more


Download Iceland’s biggest travel marketplace to your phone to manage your entire trip in one place
Scan this QR code with your phone camera and press the link that appears to add Iceland’s biggest travel marketplace into your pocket. Enter your phone number or email address to receive an SMS or email with the download link.