How to Photograph the Northern Lights

- Best DSLR Cameras for Northern Lights Photography
- Best Camera Equipment for Northern Lights Photography
- Best Camera Settings for Northern Lights Photography
- Best Apps to Photograph the Northern Lights
- Best Locations for Northern Lights Photography in Iceland
- When to Photograph the Northern Lights in Iceland
- Best Weather Conditions to See Northern Lights
- Aurora Activity Needed to Photograph the Northern Lights

What is the best way to photograph the Northern Lights? What camera is best for capturing the aurora, and what camera settings are recommended? Continue reading to learn the best tips on how to photograph the Northern Lights.
Witnessing the Northern Lights tops the bucket list of many adventurers. Iceland is one of the few places in the world where they can reliably be found. A wealth of tours dedicated to locating them has blossomed to meet demand, and you can book fantastic northern lights hotels to increase your chances of spotting them.
The chance to experience the aurora dancing over the country’s dramatic landscapes is nothing short of breathtaking. It is little wonder why many guests want to capture their beauty on film.
Most Northern Lights tours are led by guides with knowledge of how to get the best pictures, particularly Northern Lights photography workshops. Even so, photographing the aurora is not a simple affair. It is not possible to just snap the lights on a camera phone and expect the image to reflect their ethereal beauty.
Guests who want their photos to reflect their experience, and to be able to enjoy their shoots without worrying about technical difficulties, would be wise to make some preparations before arrival.
Whether it is choosing the best camera or lens for Northern Lights photography or getting to terms with the recommended settings, a little information on how to photograph the aurora borealis can transform both your portfolio and your winter vacation.
Best DSLR Cameras for Northern Lights Photography

Learning how to photograph the Northern Lights with a DSLR camera takes time to master. However, when you use the right equipment and start to practice, it becomes second nature to snapshots of one of the world's natural wonders.
To get the very best images of the aurora borealis, it’s preferable to have a full-frame or 35 mm DSLR camera with decent ISO capabilities (ideally between 2,000 and 12,800).
These cameras work best in low-light situations. More upmarket mirrorless cameras can also be used to good effect for photographing the Northern Lights.
Due to the cold of the winters in Iceland, it is advised that your camera should have a solid casing designed for harsh weather conditions.

Luckily, most modern cameras designed for landscape photography are quite durable and built for a range of different climates.
The Nikon D810, D850, and Z7 are some of the best cameras for Northern Lights photography, as are the Canon EOS 5DS R and the Sony a7R IV.
More affordable options, such as the Sony Alpha A6000 and the Nikon D3500, should still meet the needs of non-professional photographers when used with the right equipment.
As is often the case with photography, it’s usually more worthwhile to invest more into a high-quality lens than a high-quality camera.
You can always rent high-quality camera lenses that suit the shots you’re trying to take for a specified time period. This will come at a fraction of the cost of purchasing a new lens.
Best Camera Equipment for Northern Lights Photography

These are the essentials for Northern Lights photography:
-
DSLR Camera (Full Frame cameras are preferable)
-
Wide-angle or Ultra-wide angle lens
-
Tripod - a sturdy tripod that won’t shake or slip
-
Shutter Release - helps to avoid camera shake
-
Extra Camera Batteries
After sorting out the best DSLR camera, it’s time to consider the other equipment you will need.
Your first question will no doubt regard the best lens for Northern Lights photography.
Wide-angle and ultra-wide-angle lenses are the most highly recommended. They will allow you to get as much into your frame as possible and give your camera the most exposure time in the minimal light.

A wide-angle lens will also allow you to incorporate Iceland’s spectacular landscapes into your images of the aurora borealis.
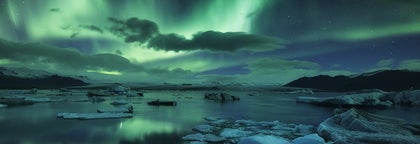
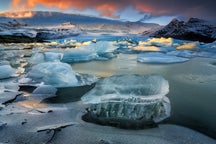
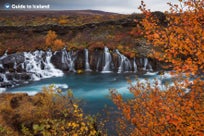
Using the Jökulsárlón Glacier Lagoon, Kirkjufell Mountain, or an erupting geyser in the foreground of your shots of the Northern Lights will only add to their beauty.
The best lenses for Northern Lights photography will have a large aperture of f/2.8 or lower.
Aperture refers to the amount of light a camera lets in. A smaller aperture, such as a more standard f/4, will result in darker photographs. This is a problem in Northern Lights photography, as obviously, the camera is already working hard to pick up the dim light of the aurora.

While most lenses do not compare to wide-angle and ultra-wide-angle lenses, panoramic and fisheye lenses can produce some interesting images for the more creative photographer.
Tripods are another essential piece of equipment to know how to use when considering how to photograph the Northern Lights. As will be discussed below, you will more often than not need a slow shutter speed and will thus want your camera to be as still and secure as possible.
On this note, you’ll also find a remote shutter very useful, as it means you won’t nudge your camera when taking your photograph. Due to the high winds in Iceland, a cordless one is recommended when shooting here.

Finally, you’ll want to bring fully charged spare batteries with you and to keep them stored in a warm place. The reason for this is that the cold will drain your battery’s life very quickly, particularly if you have a DSLR camera that is not designed for such conditions. The last thing you want is to cut your Northern Lights shoot short because of something so avoidable.
Those particularly concerned about the cold could also get a remote battery pack, which they can keep warm in a pocket.
Best Camera Settings for Northern Lights Photography

Having the appropriate equipment and lenses is a great start, but it is also wise to make sure you are comfortable with the camera settings needed for Northern Lights photography before you begin shooting.
The main thing to get used to is a longer shutter speed than you would use in traditional landscape photography.
In order for the auroras to appear clearly in your photos, you need to let enough light into your lens. If the aurora display is strong without being notably intense, you will want an aperture of f/2.8 or lower, an ISO of around 1,600, and a shutter speed of around five seconds.

This, however, will depend on the conditions of the night and the photographs you wish to take. If there is a new moon, a lot of cloud cover, or if the aurora is faint, you may want to increase your shutter speed or your ISO.
Generally speaking, you don’t want too high an ISO when taking pictures of the aurora. You’ll want to decrease the ISO on nights with a bright moon or if the auroras are particularly intense. It is usually better to shoot with a longer exposure (e.g. longer shutter speed) and a lower ISO to avoid too much noise in your pictures.
Certain phenomena, such as the aurora bands which dimly line the skies on nights with low activity, are an example of when you will want to have a longer shutter speed. Longer shutter speed will blur the movements of the aurora when it is dancing intensely. Although be careful when using this feature because your images could become overexposed.

For example, the image on the left-hand side has a long shutter speed and low ISO. Whereas the image on the right has been taken with a quick shutter speed and higher ISO.
Of course, as you are trying to minimize unnatural light, your flash will need to be off.
When photographing the Northern Lights, you’ll also want to turn off your automatic focus. While convenient in daylight, your camera will constantly be trying to find something to hone in on in the dark nights.
Instead, use the manual settings to focus on the moon or stars to get the perfect composition. Alternatively, set the focus of the lens to infinity.
Finally, be sure that your images are RAW files, as they are much larger and hold much more data. You’ll want to ensure this is complemented with the right white balance for the type of Northern Lights shot you’re trying to take.

There is no perfect must-have white balance for Northern Lights photography. Instead, you should experiment with a mixture to determine the type of shot you’d like to capture.
For example, you could manually set your white balance between 3500 and 4000 K (Kelvin White Balance) when shooting in your camera’s raw format. This will allow you to edit the images more to your preference afterward.

Alternatively, setting your camera white balance to incandescence can bring out the blue and colder tones more strongly. However, if you want a much clearer representation of reality, setting your camera to a fluorescent white balance usually comes closest to what you’ll see with the naked eye.
We’d suggest not using the automatic white balance with your camera as it can vary the image style dramatically with different shots.
This is due to the fact that the lights and colors of the aurora always change. As a result, your camera won’t be able to properly analyze the scene and define the white balance. This often leads to overly warm northern lights shots with stronger oranges and yellows in the image.
It is recommended to practice shooting with your camera settings for Northern Lights photography before your trip to make sure you are more comfortable when on location.
Best Apps to Photograph the Northern Lights

As explained above, it is not ordinarily possible to capture the aurora on a smartphone.
For those travelers who wish to capture a shot of the Northern Lights without having to fork out a lot of money on expensive equipment, there are now apps available for smartphones.
These apps replicate the settings that would be used on a DSLR camera. This allows you to capture the green of the aurora, even when the display is paler and less obvious.
The other great benefit of being able to capture the Northern Lights via an app on your phone is that the photo is then readily available for you to share on your social media or privately with your friends and family.

With all this considered, it’s easy to see the attraction of using an app to capture the Northern Lights.
The ‘Northern Lights Photo Taker’ app is highly recommended. This app has a range of simple settings to play around with, depending on the strength of the aurora.
It will capture the precise amount of light needed for the perfect photograph, ensuring you will be the envy of your friends and family back home. As the app says “All you have to do is find those lights.”
- Read more: Top 10 Apps for Traveling in Iceland
Best Locations for Northern Lights Photography in Iceland

From September to April, the Northern Lights can be seen anywhere in Iceland whenever it is dark, clear, and the forecast is good. So no matter what part of the country you are heading to, you’ll have an opportunity to try and photograph them.
In spite of this, there are a few tips on where to go to maximize your chances. Firstly, it is important to avoid urban areas as much as possible.
As mentioned, any light pollution will dilute the intensity of the lights, often obscuring them entirely. While you can find a dark spot in the city, such as at Grótta, it is a much better idea to escape the city altogether.

Similarly, if you are seeking the Northern Lights independently by renting a car (either based in Reykjavík or on a winter self-drive), you should avoid stopping in places with many tour buses. Even headlamps and other people’s electronics can impact your pictures.
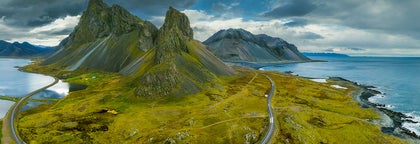
As touched upon above, some of the most beautiful places to photograph the Northern Lights are simply some of Iceland’s most beautiful places.
Many of the country’s famous features and landscapes are incredibly photogenic. They make a great foreground for pictures of the aurora, too.
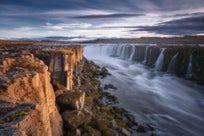
Planning your shoots at places like Jökulsárlón, Namaskarð, Thingvellir National Park, or Gullfoss will allow you to include icebergs, geothermal vents, or waterfalls in your Northern Lights photography. Due to the low light pollution in these areas, they are also favored among the best locations to see the Northern Lights in Iceland.

The nights of Iceland’s winters are longer in the North of the country. This allows travelers to areas such as Akureyri and Mývatn to spend more hours seeking and photographing the Northern Lights.
The north-east of the country, meanwhile, experiences clearer weather, meaning fewer tours will be canceled because of cloud cover.
Finally, photographers should focus on land-based Northern Lights tours rather than those by boat. While watching the auroras from the sea is spectacular, the rocking of the boat will present a host of otherwise avoidable challenges.
Other countries where the Northern Lights can be seen are those around the Arctic Circle, including Northern Norway, Canada, Russia, Sweden, Finland, and Greenland.
When the aurora forecast is particularly strong, they can be seen at latitudes much further south, in places such as the UK and mainland China.
When to Photograph the Northern Lights in Iceland

The aurora appears all year round and at all times of the day. However, in order to see them, it needs to be dark, and you need a clear sky.
As Iceland doesn't get dark at all in the summertime due to the midnight sun, you can only see the Northern Lights in winter. The best time to see the Northern Lights, therefore, is from September to April.
You don't, however, need to wait until the middle of the night to see the aurora. If they are strong, you can often see them very clearly at dusk or dawn.

Photographing the auroras when it isn't completely dark outside may even help you to get focus and include more landscape in the photo.
If the aurora is weak, however, you will need to wait until night has fully set in, and you'll need your eyes to adjust to the darkness.
A good trick for finding where weak Northern Lights are dancing is to take a picture of the night sky. Looking at the scene through a camera screen will pick up any activity, as lenses let in more light than the human eye.
Best Weather Conditions to See Northern Lights

The main weather condition that impedes the appearance of the Northern Lights in Iceland and other locations is cloud cover. With heavy cloud cover, it’s almost impossible to see the Northern Lights, and you will need to wait for cloud gaps.
To maximize your chances, you can check the cloud cover forecast and the aurora forecast in Iceland and take advantage of spots in the country with cloud gaps.
Even so, photographers should be aware of the challenges other weather can bring to their shoots to help get the best images.
The most notable of these is the temperature. As the auroras only appear at night, shoots can get very chilly very quickly for those who are unprepared.

For all trips to Iceland in winter, you should bring windproof, waterproof, and warm clothing. This is especially important when you are planning to be outside without moving much for a prolonged period.
You’ll want thick gloves for when you are waiting for the lights to show, even if you need to take them off to adjust your camera settings.
Even if traveling in more temperate months, such as September and April, the weather can be fickle, and the nights are often freezing.
Another factor to consider is the wind; not only can it be incredibly chilling, but it can also be very powerful. Leaving a tripod with an expensive camera and lens unattended could result in a very costly accident should it be caught up in one of Iceland’s unpredictable gusts of wind.

Another enemy of aurora hunters is full moons. When Northern Lights activity is weak, often the bright light from a full moon can partially, if not fully, impact your view and photos. As pedantic as it might seem, planning your visit in line with the lunar cycle can help your ability to get some great shots.
A final thing to note is the snow and ice that covers Iceland’s ground in midwinter. If traveling out into nature, it is advisable to wear crampons over your boots to prevent slipping over. This is particularly easy to do at night when visibility is low.
The weather is regularly updated on Iceland’s weather website. This will quickly become an oracle of information on your trip to Iceland, as the weather can change rather quickly.
Ideally, the best weather conditions for Northern Lights are clear skies (no cloud coverage), a strong KP forecast, dark nights, a new moon, and no light pollution. Experience in night photography might come in handy when it comes to photographing the aurora, but this is by no means a necessity.
Joining a Northern Lights tour may be the best bet for inexperienced photographers. The guides are more than happy to assist travelers with setting up their camera to photograph the night sky.
Aurora Activity Needed to Photograph the Northern Lights

Aurora activity occurs all the time. Charged particles released from the sun are redirected by Earth’s magnetic field to the poles. As they penetrate the atmosphere, they create the Northern (and Southern) Lights. They can only be seen during winter nights simply because this is the only time that is dark enough.
The intensity of the auroras, however, is dependent on solar activity. This activity is measured, and as such, a forecast can be predicted for how likely the lights are to be seen. This is explained on a scale of 0 to 9 KP.
A forecast of 0 Kp means the aurora will most likely not appear, while anything above a 2 is usually worth heading out for in Iceland.
Aurora forecasts above 5 Kp is considered a geomagnetic storm, and such an occurrence is rare.

Although it is prudent to check the aurora borealis forecast in Iceland before departing to photograph the Northern Lights, please note that it is not entirely reliable.
Though you will undoubtedly want to experience the most intense aurora show imaginable, you will still be able to capture some spectacular images, even if they are faint.
Cameras are more sensitive to light than the human eye and will often capture colors and shapes you cannot see. This can sometimes result in unexpectedly spectacular photographs. As such, even a somewhat disappointing KP forecast may not be an impediment to your Northern Lights photography.

A final note on how to photograph the Northern Lights in regard to the aurora forecast is that they are very unpredictable. Therefore, exercising patience is essential. Allow your eyes to fully adjust to the darkness, and even if there is no sign of them, be prepared to wait.
At any moment, the auroras could descend with incredible intensity, providing you with otherworldly photographs that will be the prize of your portfolio.
We hope this guide helps you better understand how to photograph the Northern Lights. We wish you the best of luck in capturing the perfect photos to remember your experience in Iceland.


Andere interessante artikelen


Het noorderlicht in IJsland - Wanneer & Waar je het aurora kunt zien
Leer alles wat je moet weten over het zien van het noorderlicht in IJsland in deze uitgebreide gids. Ontdek de beste plaatsen om de aurora borealis te zien en leer wanneer je het gedurende het jaar...Lees verderDe Beste Tijd om het Noorderlicht te Zien in IJsland
Leer de beste tijd van het jaar om het noorderlicht in IJsland te zien. Ontdek wat de beste seizoenen en maanden zijn om het noorderlicht te zien in IJsland. Het noorderlicht is een van de meest magi...Lees verder


Download het grootste reisagentschap van IJsland op je telefoon en beheer je hele reis op één plek
Scan deze QR-code met de camera van je telefoon en klik op de link om het grootste reisagentschap van IJsland in je zak te stoppen. Voeg je telefoonnummer of e-mailadres toe om een sms of e-mail te ontvangen met de downloadlink.