What is the best way to photograph the northern lights in Iceland? What camera is ideal for capturing the aurora, and what camera settings are recommended? When and where should you go for the best chances of seeing them? Continue reading to discover the best tips for photographing this stunning natural phenomenon in Iceland.
Witnessing the northern lights tops the bucket list of many adventurers, and Iceland is one of the few places in the world where they can be seen with relative reliability. There are numerous northern lights tours and vacations dedicated to locating them that have blossomed to meet demand, and you can book fantastic northern lights hotels to increase your chances of spotting this visual delight.
Why You Can Trust Our Content
Guide to Iceland is the most trusted travel platform in Iceland, helping millions of visitors each year. All our content is written and reviewed by local experts who are deeply familiar with Iceland. You can count on us for accurate, up-to-date, and trustworthy travel advice.
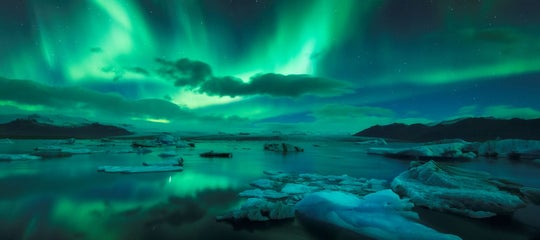
The chance to experience the aurora dancing over the country’s dramatic landscapes is nothing short of breathtaking. It is little wonder why so many guests want to capture their beauty on film.
Most northern lights tours are led by experienced guides who know how to help you get the best shots, particularly those offered as northern lights photography workshops. Still, photographing the aurora can be challenging. Simply pointing a phone camera at the sky won’t do justice to their elusive, shimmering beauty.
Guests who want their photos to reflect the magic of their experience and enjoy the process without technical hiccups should consider preparing in advance. Whether you're selecting the right camera and lens for northern lights photography or learning the recommended settings, having some insight into how to photograph northern lights can elevate both your images and your overall winter trip.
What to Know
-
The best camera for northern lights photography is a 35 mm DSLR camera with a high-quality lens and good ISO capabilities.
-
Beyond just your camera, it's a good idea to bring other photography equipment with you, including a tripod and extra batteries.
-
Knowing the ideal northern lights camera settings is also important for the best results — aim for an aperture of f/2.8 or lower and a shutter speed of five seconds.
-
There are several phone apps that can be used to mimic the settings of a DSLR camera, including the Northern Lights Photo Taker.
-
Photographing the northern lights is best done between September and April in remote locations with less light pollution on days with little cloud cover.
-
Before heading out on your northern lights photo shoot, read through our FAQ to learn more helpful details.
When to Photograph the Northern Lights in Iceland

While the aurora occurs throughout the year, it is only visible when the nights are long and dark. In Iceland, the best time to see the northern lights is usually in winter from September to April, since the midnight sun prevents darkness during the summer months.
However, you don't need to wait until the middle of the night to see the aurora. If they are strong, you can often see them very clearly at dusk or dawn.
Photographing the auroras when it isn't completely dark outside may even help you to get additional focus and include more of the landscape in the photo. If the aurora is weak, you will need to wait until night has fully set in, and you'll need your eyes to adjust to the darkness.
A good trick for finding where weak northern lights are dancing is to take a picture of the night sky. Looking at the scene through a camera screen will pick up any activity, as lenses let in more light than the human eye.
Best Weather Conditions to See the Northern Lights

Cloud cover is the main weather condition that gets in the way of seeing the northern lights in Iceland and other places. With heavy cloud cover, it’s almost impossible to see the northern lights, and you will need to wait for cloud gaps.
To maximize your chances, you can check the cloud cover forecast and the aurora forecast in Iceland and take advantage of spots in the country with cloud gaps.
Even so, photographers should be aware of the challenges other weather can bring to their shoots to help get the best images.
The most notable of these is the temperature. As the auroras only appear at night, shoots can get very chilly very quickly for those who are unprepared.

For all trips to Iceland in winter, you should bring windproof, waterproof, and warm clothing. This is especially important when you are planning to be outside without moving much for a prolonged period.
You’ll want thick gloves for when you are waiting for the lights to show, even if you need to take them off to adjust your camera settings.
Even if traveling in more temperate months, such as September and April, the weather can be fickle, and the nights are often freezing.
Another factor to consider is the wind; not only can it be incredibly chilling, but it can also be very powerful. Leaving a tripod with an expensive camera and lens unattended could result in a very costly accident should it be caught up in one of Iceland’s unpredictable gusts of wind.
Best Months to Visit Iceland for Northern Lights Photography
 While the aurora itself is driven by solar activity and can’t be predicted far in advance, seasonal conditions in Iceland vary quite a bit from month to month. This can make a big difference in your photography experience. Here's a quick look at what to expect throughout the northern lights season, from September to April:
September and October
These early-season months offer milder temperatures, longer twilight hours, and less snow, which means more accessible roads and hiking trails. You’ll get around 10 to 13 hours of darkness, which is enough for aurora hunting, and you can often capture the lights with clear reflections in lakes or against colorful autumn landscapes.
November to February
These are the darkest months of the year, with up to 20 hours of night in December and January. This gives you the most time to chase and photograph the aurora. However, the weather can be more unpredictable, with frequent snowstorms, strong winds, and cloud cover. Roads in remote areas may be closed or icy, but the snowy landscapes add a magical touch to your images.
March and April
Daylight starts to return quickly in these months, but you still get several hours of darkness, enough for aurora viewing. March is often a favorite among photographers for its balance of longer days and cold, clear nights. By April, temperatures begin to rise, snow starts to melt, and the conditions are generally more stable, though chances of seeing the aurora gradually decline.
Best Locations for Northern Lights Photography in Iceland
 From September to April, the northern lights can be seen across Iceland, as long as both the sky and surroundings are dark and clear. So, no matter where you're traveling in the country, you'll have a chance to photograph them if conditions are right and you're far enough from city lights.
Any light pollution will dilute the intensity of the lights, often obscuring them entirely. While you can find places to see the northern lights in Reykjavik, such as Grotta Nature Reserve, it is a much better idea to escape the city altogether.
Similarly, if you are seeking the northern lights independently by renting a car (either based in Reykjavik or on winter self-drive tours), you should avoid stopping in places with many tour buses. Even headlamps and other people’s illuminated devices can impact pictures.
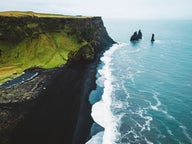
Many of the best places to photograph the northern lights also happen to be among Iceland’s most stunning natural landmarks. The country’s iconic landscapes not only offer breathtaking views but also serve as striking foregrounds for capturing the aurora in all its beauty.
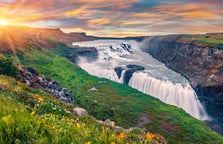
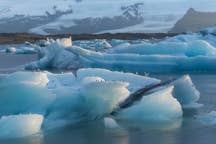
 Planning your shoots at places like Jokulsarlon Glacier Lagoon, Namaskard Pass, Thingvellir National Park, or Gullfoss Waterfall will allow you to include icebergs, geothermal vents, or waterfalls in your northern lights photography. Due to the low light pollution in these areas, they are also favored among the best locations to see the northern lights in Iceland.
The nights of Iceland’s winters are longer in the north of the country. This allows travelers to areas such as Akureyri and Lake Myvatn to spend more hours seeking and photographing the northern lights. Northeast Iceland, meanwhile, generally experiences clearer weather, meaning you may have better spotting chances.
Other countries where the northern lights can be seen are those around the Arctic Circle, including Northern Norway, Canada, Russia, Sweden, Finland, and Greenland. When the aurora forecast is particularly strong, they can be seen at latitudes much further south, in places such as the UK and mainland Europe.
The Aurora Activity Needed to Photograph the Northern Lights
 What are the northern lights? Auroras occur when charged particles released from the sun are redirected by Earth’s magnetic field to the poles. As they penetrate the atmosphere, they create the northern lights (aurora borealis) in the Northern Hemisphere and the southern lights (aurora australis) in the Southern Hemisphere.
They can only be seen during winter nights simply because this is the only time that is dark enough.
The intensity of the auroras, however, is dependent on solar activity. This activity is measured, and as such, a forecast can be made for how likely the lights are to be seen. This is explained on a scale of 0 to 9 Kp.
A forecast of 0 Kp means the aurora will most likely not appear, while anything above a 2 is usually worth heading out for in Iceland. Aurora forecasts above 5 Kp is considered a geomagnetic storm, and such an occurrence is rare.
Although it is wise to check the aurora borealis forecast in Iceland before departing to photograph the northern lights, please note that it is not entirely reliable. Though you will undoubtedly want to experience the most intense aurora show imaginable, you will still be able to capture some spectacular images, even if they are faint.
Cameras are far more sensitive to light than the human eye and will often capture colors and shapes you cannot see. This can sometimes result in unexpectedly spectacular photographs.
As such, even a somewhat disappointing Kp forecast may not be an obstacle to your northern lights photography.
-
Also read: 22 Photos of the Aurora in Iceland
Why 2026 Is Ideal for Northern Lights Photography in Iceland

If you're hoping to photograph the northern lights, 2026 is an excellent year to visit Iceland. The sun has recently passed the peak of its activity cycle, known as the solar maximum — a period associated with stronger solar storms and more intense aurora displays.
Although the peak has already occurred, solar activity remains elevated in 2026. This continued activity increases the chances of bright, colorful, and dynamic auroras appearing across Iceland. For photographers, that means more opportunities to capture vivid skies, dramatic movement, and rare displays that don’t happen every year.
Cameras You Can Use To Capture the Northern Lights
 Capturing the northern lights in Iceland is a dream for many photographers and adventurers, but doing it well requires the right camera. Because the aurora borealis appears in low-light conditions, you’ll need a camera capable of long exposures, high ISO performance, and manual controls. Here are some great camera options to consider:
DSLR Cameras (Digital Single-Lens Reflex)
DSLRs are a top choice for aurora photography due to their large sensors and full manual control. More up-to-date DSLR options include the Canon EOS-1D X Mark III and the Nikon D850. Both offer excellent low-light capability and produce stunning results with the right lens.
Mirrorless Cameras
Mirrorless cameras are compact, powerful, and increasingly popular for night photography. The Sony Alpha a7 IV, Fujifilm X-T5, and Canon EOS R5 Mark II are excellent choices, delivering sharp images and great ISO performance in dark conditions.
High-End Compact Cameras
If you want something more portable, high-end compact cameras like the Sony RX100 VII, Panasonic Lumix LX100 II, or Canon PowerShot G7 X Mark III offer decent low-light performance and manual settings, making them a good option for casual travelers.
Action Cameras
Some newer action cameras like the GoPro HERO12 Black have improved night modes, but they’re generally less reliable for capturing the fine detail of the aurora. They can, however, be useful for time-lapse videos and adventurous shots.
Smartphones with Advanced Features
Flagship smartphones such as the iPhone 16 Pro or Samsung Galaxy S25 Ultra now include advanced night photography modes. While they can’t match a DSLR or mirrorless camera, they’re surprisingly capable if you’re caught without your main gear.
Best Camera Types for Photographing the Northern Lights

To take great photos of the northern lights, you need a good camera. The two best types are DSLR and mirrorless cameras, each offering key advantages for night sky photography.
DSLR cameras have been around for a long time. They are reliable and take high-quality photos, especially in low light. But now, many people prefer mirrorless cameras, which are a newer version. They are smaller, lighter, and often easier to use. Mirrorless cameras also show you what your photo will look like before you take it, which helps a lot when shooting in the dark.
Due to Iceland’s harsh winter conditions, it’s recommended to use a camera with a sturdy, weather-resistant casing. Fortunately, many DSLRs and mirrorless cameras built for landscape photography are designed to withstand a variety of challenging climates.
DSLR
 Learning how to take pictures of northern lights with a DSLR camera takes time to master. However, when you use the right equipment and start to practice, taking snapshots of one of the world's natural wonders becomes second nature.
To get the very best images of the aurora borealis, it’s preferable to have a full-frame or 35 mm DSLR camera with decent ISO capabilities (ideally between 2,000 and 12,800). These cameras work best in low-light situations. More upmarket mirrorless cameras can also be used to good effect for photographing the northern lights.
Some of the best DSLRs for capturing the northern lights include the Nikon D810, D850, and the Canon EOS 5DS R. More affordable DSLR options, like the Nikon D3500, can still meet the needs of non-professional photographers when paired with the right equipment.
Usually, investing in high-quality lenses makes a bigger difference than upgrading your camera body. If buying a lens isn’t an option, renting high-quality lenses for the shots you want can be a more affordable choice. This will come at a fraction of the cost of purchasing a new lens.
Other Equipment To Use With a DSLR for Capturing the Northern Lights
 After sorting out the best DSLR camera, it’s time to consider the other equipment you will need. Having the right gear and equipment can really make a difference. The following are the essentials that go with DSLRs for northern lights photography:
Lenses
Wide-angle and ultra-wide-angle lenses are the most highly recommended for northern lights photography. They allow you to get as much into your frame as possible and give your camera the most exposure time in minimal light.
A wide-angle lens also allows you to incorporate Iceland’s spectacular landscapes into your images of the aurora borealis. Using the Jokulsarlon Glacier Lagoon, Kirkjufell Mountain, or the Geysir Geothermal Area in the foreground of your shots of the northern lights will only add to their beauty.
The best lenses for northern lights photography will have a large aperture of f/2.8 or lower. Aperture refers to the amount of light a camera lets in. A smaller aperture, such as a more standard f/4, will result in darker photographs. This is a problem in northern lights photography, as obviously, the camera is already working hard to pick up the dim light of the aurora.
While most lenses do not compare to wide-angle and ultra-wide-angle lenses, panoramic and fisheye lenses can produce some interesting images for the more creative photographer.
Tripod and Shutter Release
Since capturing the aurora often requires a slow shutter speed, keeping your camera stable is key to getting sharp, well-exposed shots. Be sure to bring a sturdy tripod that won’t shake or slip.
A remote shutter is also highly useful, helping you avoid any movement that could blur the image. Given Iceland’s frequent high winds, a cordless remote is generally the best option for shooting in these conditions.
Spare Batteries
Finally, you’ll want to bring fully charged spare batteries with you and keep them stored in a warm place. The reason for this is that the cold will drain your battery’s life very quickly, particularly if you have a DSLR camera that is not designed for such conditions.
The last thing you want is to cut your northern lights shot short because of something so avoidable. Those particularly concerned about the cold could also get a remote battery pack, which they can keep warm in a pocket.
Quick DSLR Camera Settings Guide for Capturing the Northern Lights
 Having the appropriate equipment and lenses is a great start, but it is also wise to make sure you are comfortable with the camera settings needed for northern lights photography before you begin shooting. The main thing to get used to is a longer shutter speed than you would use in traditional landscape photography.
In order for the auroras to appear clearly in your photos, you need to let enough light into your lens. If the aurora display is strong without being notably intense, you will want an aperture of f/2.8 or lower, an ISO of around 1,600, and a shutter speed of around five seconds.
This, however, will depend on the conditions of the night and the photographs you wish to take. If there is a new moon, a lot of cloud cover, or if the aurora is faint, you may want to increase your shutter speed or your ISO.
 Generally speaking, you don’t want too high an ISO when taking pictures of the aurora. You’ll want to decrease the ISO on nights with a bright moon or if the auroras are particularly intense.
It is usually better to shoot with a longer exposure (e.g. longer shutter speed) and a lower ISO to avoid too much noise in your pictures.
Certain phenomena, such as the aurora bands that dimly line the skies on nights with low activity, are an example of when you will want to have a longer shutter speed. A longer shutter speed will blur the movements of the aurora when it is dancing intensely. However, be careful when using this feature because your images could become overexposed, meaning they will be too bright.

When photographing the northern lights, you’ll also want to turn off your automatic focus. While convenient in daylight, your camera will constantly be trying to find something to hone in on in the dark nights.
Instead, use the manual settings to focus on the moon or stars to get the perfect composition. Alternatively, set the focus of the lens to infinity.
Finally, be sure that your images are RAW files, as they are much larger and hold much more data. You’ll want to ensure this is complemented with the right white balance for the type of northern lights shot you’re trying to take.
There is no perfect must-have white balance for northern lights photography. Instead, you should experiment with a mixture to determine the type of shot you’d like to capture.
 For example, you could manually set your white balance between 3500 and 4000 K (Kelvin White Balance) when shooting in your camera’s raw format. This will allow you to edit the images more to your preference afterward.
Setting your camera’s white balance to “incandescent” can enhance the cooler, blue tones of the aurora. For a more natural look that closely matches what you see with the naked eye, a “fluorescent” white balance setting is often the most accurate.
It's generally best to avoid using automatic white balance, as the shifting colors and intensity of the aurora can cause inconsistencies from shot to shot. Because the lights are constantly changing, your camera may struggle to interpret the scene correctly and apply a consistent white balance.
 This often leads to overly warm northern lights shots with stronger oranges and yellows in the image. It is recommended to practice shooting with your camera settings before your trip to photograph the northern lights to make sure you are more comfortable when on location.
Here are some quick tips for setting up your DSLR camera to capture the northern lights:
- Use manual focus and set it to infinity or focus on a distant light like the moon or stars.
- Turn flash and auto-focus off—they’ll interfere with long exposure shots.
- Start with these base settings: aperture f/2.8 or lower, ISO ~1600, shutter speed ~5 seconds.
- Adjust ISO and shutter speed based on aurora intensity, moonlight, and cloud cover.
- Favor longer shutter speeds and lower ISO to reduce image noise.
- Be cautious: long exposures can blur fast-moving auroras or cause overexposure.
- Always shoot in RAW for maximum editing flexibility.
- Set white balance manually—try 3500–4000 K or use “fluorescent” for more natural tones.
- Avoid auto white balance, which may distort aurora colors.
- Practice with your camera’s settings ahead of time to feel confident when the lights appear.
Mirrorless Camera
 Mirrorless cameras are a great choice for photographing the northern lights thanks to their lighter design, advanced electronic viewfinders, and real-time exposure previews. But even with the right gear, it’s important to know how to set up your camera correctly for low-light conditions.
One big advantage of mirrorless systems is that you can see how your exposure will look before taking the shot, thanks to the live view in the electronic viewfinder or on the screen. This can save time and reduce trial-and-error when adjusting settings in the dark.
Other Equipment To Use With a Mirrorless Camera for Capturing the Northern Lights
 Once you've chosen the right mirrorless camera for northern lights photography, it’s time to think about the gear that complements it. While mirrorless cameras are typically lighter and more compact than DSLRs, they also come with their own set of equipment needs, especially when shooting in cold, low-light conditions like those found in Iceland.
Lenses
For mirrorless cameras, you’ll want wide-angle or ultra-wide-angle lenses specifically designed for your camera’s mount (or with the correct adapter if you're using DSLR lenses). These lenses help you capture expansive views of the sky, making them perfect for photographing the northern lights.
Many modern mirrorless cameras handle low light well, but you'll still need a fast lens, ideally with an aperture of f/2.8 or wider, to capture enough light during long exposures. This allows more light to reach the sensor, which is especially important in dark environments.
Some photographers also like using manual lenses (such as Samyang or Rokinon), which often perform well in low light and usually cost less. These lenses are a good option if you're comfortable focusing manually.
Tripod and Remote Trigger
Even though mirrorless cameras are lighter, a sturdy tripod is still a must. In windy environments like Iceland, lighter gear can be more prone to movement, so choose a solid tripod with strong leg locks and non-slip feet. Avoid travel tripods that are too lightweight unless they’re well-weighted or stabilized.
Mirrorless cameras benefit from electronic shutter modes or touchless shutter features via companion apps, which can eliminate the need for a physical remote. However, a wireless remote trigger or smartphone app is still recommended to prevent shake during long exposures, especially when using physical shutter buttons in manual mode.
Many mirrorless systems also support interval shooting or built-in timers, so take advantage of those features when shooting time-lapses or avoiding physical contact with the camera.
Spare Batteries
Unlike DSLRs, mirrorless cameras consume more battery power, mainly because the electronic viewfinder (EVF) and LCD screen are always active. In cold weather, this drain becomes even more noticeable.
Always bring multiple fully charged batteries, and keep them warm in an inner pocket close to your body. Some mirrorless users also carry a USB power bank and a USB-C charging cable, as many modern mirrorless cameras allow on-the-go charging, even while shooting (check if your model supports this).
For extremely cold conditions, a battery grip or external battery adapter can help extend shooting time. Just make sure the gear is rated for cold environments.
Quick Mirrorless Camera Settings Guide for Capturing the Northern Lights
 A good starting point for northern lights photography with a mirrorless camera is:
- Aperture: f/2.8 or lower (to let in as much light as possible)
- ISO: Around 1600
- Shutter Speed: About 5 seconds
These values are not fixed. On a darker night (like during a new moon or when auroras are faint), you may need to raise your ISO or slow your shutter speed. If the aurora is very active and bright, you might be able to reduce your ISO or use a faster shutter speed to avoid overexposure.
Mirrorless cameras usually handle high ISO levels quite well, especially newer models with larger sensors. Still, it's best to keep the ISO as low as you can while maintaining a proper exposure to reduce image noise.
 You can also take advantage of focus magnification and focus peaking—two common features in mirrorless cameras that help with manual focusing. These tools make it easier to focus on a star, planet, or distant light source in the dark. Avoid autofocus, as it can struggle at night and waste valuable time.
Since auroras are always changing, you might need to adjust your camera settings quickly while you're shooting. Mirrorless cameras make this easier with their intuitive controls and live feedback, allowing you to react quickly to the scene.
When it comes to white balance, don’t rely on automatic settings. The shifting light and colors can confuse the camera. Instead:
- Try manual white balance between 3500–4000 K
- Use “fluorescent” for a more natural look
- Use “incandescent” to enhance cooler tones
 Avoid using flash altogether—it won’t help with aurora photos and can interfere with long exposures.
Finally, always shoot in RAW format. Mirrorless cameras offer excellent RAW file quality, which gives you more control when editing later, especially for adjusting brightness, white balance, and noise levels.
Here are some quick tips for setting up your mirrorless camera to capture the northern lights:
- Use manual focus, assisted by focus peaking or magnification, and focus on stars or a distant light.
- Turn off flash and autofocus—they aren't helpful for aurora shots.
- Start with base settings: aperture f/2.8, ISO ~1600, shutter speed ~5 seconds.
- Adjust settings based on aurora strength, cloud cover, and moonlight.
- Take advantage of live exposure preview to fine-tune settings in real-time.
- Use lower ISO and longer shutter speeds when possible to reduce noise.
- Watch out for overexposure when auroras move fast—shorten shutter speed if needed.
- Shoot in RAW for better editing flexibility.
- Set white balance manually—aim for 3500–4000 K, or use “fluorescent” for a natural tone.
- Avoid auto white balance to keep your aurora colors consistent.
- Practice using manual focus and exposure controls before your trip so you're confident when the lights show up.
Capturing the Northern Lights With Your Smartphone
 DSLR and mirrorless cameras are often seen as the top choices for photographing the northern lights because of their advanced features and ability to handle low light. However, smartphones have become increasingly popular for this purpose, mainly because they are so convenient. You almost always have your phone with you, making it easy to capture the incredible moment when the aurora appears.
Smartphones have improved a lot in recent years, with many models offering night modes and long exposure settings that help in low-light situations. Some even use artificial intelligence to enhance colors and brightness automatically, making your northern lights photos look more vivid.
That said, smartphones do have limitations compared to professional cameras. Their smaller sensors and lenses generally mean they can’t gather as much light, which is important when shooting the dim and constantly moving auroras. This can result in less sharp images, more noise (graininess), and fewer manual controls over settings like ISO, shutter speed, and focus.
Despite these limitations, smartphones are a great option if you want to share quick, decent-quality photos on social media or simply enjoy capturing the magic of the northern lights without carrying heavy equipment. Plus, with various apps available, you can get more control over your phone’s camera settings to improve your shots.
Best Apps To Use When Taking Northern Lights Photos With Smartphones
 For those travelers who wish to capture a shot of the aurora borealis without having to spend a lot of money on expensive equipment, there are now apps available for smartphones. These apps replicate the settings that would be used on a DSLR camera, allowing you to capture the green of the aurora, even when the display is paler and less obvious.
The other great benefit of being able to capture the northern lights via an app on your phone is that the photo is then readily available for you to share on your social media or privately with your friends and family. Here are some apps you can try with your smartphone:
-
Northern Lights Photo Taker — This highly recommended app has a range of simple settings to play around with, depending on the strength of the aurora. It will capture the precise amount of light needed for the perfect photograph, ensuring you will be the envy of your friends and family back home. As the app says, “All you have to do is find those lights.”
-
NightCap Camera — The NightCap Camera app is another great option for capturing the northern lights. It excels in low light and nighttime photos and even has an Astronomy mode for northern lights and the stars.
-
Slow Shutter — Longer shutter speed is ideal for taking photos of the northern lights, which is why the Slow Shutter app is a great choice. The app also has alternative capture modes for more unique photography.
- Read more: Top 10 Apps for Traveling in Iceland
Top-Rated Northern Lights Tours in Iceland
 Iceland offers a wide range of northern lights tours, many of which are perfect for those interested in northern lights photography. The chance to capture this elusive natural phenomenon is also featured in most photo tours in Iceland.
For better photo opportunities, photographers are generally better off choosing land-based tours rather than those by boat. While viewing the auroras from the sea can be a spectacular experience, the boat's movement makes long-exposure photography difficult due to camera shake and instability.
If you're more interested in capturing the memory than taking the photos yourself, many tours also include professional photography services. Below are several top-rated northern lights tours that offer the right conditions for getting that perfect shot.
-
The Northern Lights Bus Tour from Reykjavik — Travel out to Iceland's darkest and most beautiful corners for a chance to see the northern lights on this relaxing bus tour.
-
Northern Lights Tour With Free Photos & Refreshments — On this northern lights tour, you'll venture out to the Icelandic countryside and enjoy free photos and refreshments.
-
The Northern Lights Super Jeep Tour from Reykjavik with Free Photos — Hunt for northern lights, take in Iceland's stunning scenery, and more during this Super Jeep tour.
Top Self-Driving Tours for Northern Lights Photography in Iceland
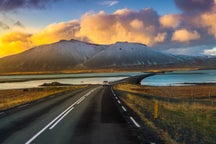
 Looking to capture the northern lights without being tied to a group schedule? These self-drive tours let you explore Iceland’s dramatic scenery at your own pace while seeking out the aurora borealis on your own terms.
-
7-Day Northern Lights Self-Drive Tour of South Iceland, the Golden Circle & Snaefellsnes Peninsula — Travel across Iceland's most iconic locations and have a chance to see the northern lights on this weeklong tour.
-
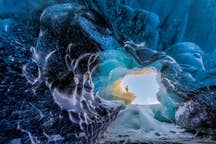
Magical 6-Day Northern Lights Self-Drive Tour on the South Coast of Iceland with Ice Caving — During this six-day tour, you'll hunt for northern lights while discovering black sand beaches, glaciers, and other captivating sights.
-
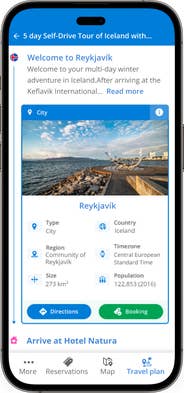
5-Day Northern Lights Winter Self-Drive Tour with the Golden Circle & Jokulsarlon Glacier Lagoon — Across five days, you'll drive across Iceland in search of northern lights while enjoying breathtaking views and stunning landscapes.
Capturing the Northern Lights in Iceland’s Landscapes

A final note on photographing the northern lights, especially when it comes to the aurora forecast, is that the lights are highly unpredictable. That’s why patience is key.
To deepen your understanding, consider visiting the Aurora Reykjavik Northern Lights Center, where you can learn more about the aurora borealis, get help with camera settings, and pick up tips on how to read the forecast.
Once you're out in the field, give your eyes time to fully adjust to the darkness, and even if the sky looks empty, stay ready. The auroras can appear suddenly and with breathtaking intensity, offering you the chance to capture truly otherworldly images that may become the highlight of your portfolio.
What is the best ISO for northern lights photography in Iceland?
What shutter speed should you use for the aurora borealis in Iceland?
What aperture is best for northern lights photos?
Can beginners photograph the northern lights in Iceland?
Can you take videos of the northern lights with a camera or smartphone?
While smartphones with night mode can record short clips, DSLR and mirrorless cameras deliver better results due to superior low-light performance. Capturing video is more challenging than photography because the aurora moves quickly and needs longer exposure to appear clearly.
Why are my northern lights photos blurry?
Why do my northern lights photos look dark?
Why are my aurora photos grainy?
Why do northern lights look better in photos than in real life?
How do you protect your camera when photographing the northern lights in Iceland?
- Keep it secure and shielded from cold, moisture, and wind by storing your gear in a weather-sealed camera bag.
- Always use a camera strap to prevent drops. Adding a lens hood and UV filter helps prevent damage from frost, debris, and accidental contact.
- Avoid battery drain and ensure consistent performance in low-light conditions by carrying spare batteries, keeping them warm in an inner pocket, and limiting screen time.
How do you stay warm while photographing the northern lights in Iceland?
- Dress in layered, insulated clothing designed for cold weather. Start with moisture-wicking base layers, add insulating mid-layers, and finish with windproof and waterproof outerwear.
- Wear thermal hats, gloves, and insulated boots to protect against freezing temperatures during long nights of northern lights photography.
- Bring a thermos with hot drinks and move occasionally to help maintain body heat and circulation while waiting for the aurora borealis to appear.
Is it safe to look at the northern lights with your eyes?
We hope this guide helps you better understand how to photograph the northern lights. We wish you the best of luck in capturing the perfect photos to remember your experience in Iceland.

I was the Content Manager at Guide to Iceland from 2013 to 2018, and now run the creative studio Huldufugl while working as a freelance writer. I’m passionate about storytelling, Icelandic culture, and creating thoughtful experiences through words and visuals.