In this guide, you’ll learn the best time to visit Iceland’s ice caves, how they form, what gear to bring, and which camera settings work best in low light. You’ll also find key safety tips and creative techniques to enhance your images. Tips from photography tours in Iceland can offer helpful guidance in these environments.
Why You Can Trust Our Content
Guide to Iceland is the most trusted travel platform in Iceland, helping millions of visitors each year. All our content is written and reviewed by local experts who are deeply familiar with Iceland. You can count on us for accurate, up-to-date, and trustworthy travel advice.
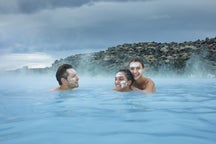
For travelers interested in exploring Iceland’s cave environments, options range from lava tubes to shimmering blue ice. One can often choose between guided ice cave tours and a more specialized glacier photography tour. Much of the dramatic ice you see in photos comes from ice caving and glacier hiking in Vatnajokull National Park.
With the right knowledge and planning, ice-cave photography becomes one of the most rewarding experiences in Iceland. The guide below walks you through everything you need to prepare, so you can step into these frozen landscapes with confidence and capture images you’ll be proud to share.
Key Takeaways
-
Ice caves change every season, so each visit brings new patterns and formations.
-
The best time to photograph ice caves is winter, from early November to March.
-
Guided tours are essential for safe access and up-to-date information on conditions.
-
Pack layered winter clothing, wear crampons, and bring a tripod, a wide-angle lens, and spare batteries.
-
Creative framing, focus stacking, and controlled lighting make your images stand out.
-
Combine your ice-cave session with northern lights tours or visits to the country’s spectacular waterfalls, for even more photo opportunities.
Best Time To Photograph Ice Caves
 Winter is the primary season for visiting ice caves in Iceland. From early November to March, cold temperatures keep the ice stable and the colors at their most intense. During these months, the angle of sunlight also creates a deep blue glow that enhances photographs.
Some natural caves, such as the Katla Ice Cave beneath Myrdalsjokull Glacier, can be accessible outside winter when conditions allow. However, availability changes daily and depends on the results of safety inspections. Always join a guided Katla ice cave tour to confirm which caves are open.
If you’re interested in an experience that’s available year-round, the man-made ice tunnel in Langjokull Glacier is a great alternative. This tunnel, created deep within the ice, lets visitors walk through illuminated chambers and learn about the glacier’s structure.
Recommended Camera Gear for Photographing Ice Caves in Iceland
 Ice caves are low-light environments, so you’ll need equipment that performs well in challenging conditions. Below are the recommended gear to capture beautiful photos of Ice caves in Iceland:
-
Digital camera with manual controls and RAW capability
-
Wide-angle lens (15–30 mm full-frame equivalent)
-
Tripod with stable legs for uneven ice
-
Remote shutter or timer to avoid camera shake
-
Extra batteries (cold weather drains power quickly)
-
Microfiber cloths for wiping moisture off your lens and camera
-
Waterproof camera bag or dry sack
A mirrorless or DSLR camera handles low light better than most compact systems, but even smartphones can produce strong results with proper lighting and stabilization.
Camera Settings for Photographing Ice Caves
 Each cave’s light level changes throughout the day, so treat these as starting points, not fixed rules. These simple adjustments ensure your photos retain the natural color gradients that make Iceland’s ice caves so mesmerizing.
-
Mode: Manual exposure. Adjust one setting at a time and check your histogram.
-
Aperture: Use around f/9–f/13 for a wide depth of field. Open to f/4–f/5.6 only when the light is very limited.
-
ISO: Start at ISO 200–800. Keep it as low as possible for noise control.
-
Shutter speed: On a tripod, use slow shutters to expose correctly without clipping highlights. Try 1–6 seconds for a smooth water effect or 1/125 second to freeze motion.
-
White balance: Auto works fine; adjust later from RAW files.
-
Focus: Switch to manual focus. Focus one-third into the scene or on a foreground texture, then recheck with magnified live view.
-
Stability: Turn off image stabilization when on a tripod and use a 2-second timer or remote release.
-
Dynamic range: If the cave entrance is bright, capture two exposures (one for highlights and one for shadows) and blend later if needed.
Creative Tips To Photograph an Ice Cave in Iceland
 Once you’ve set your exposure and mastered the basics, it’s time to experiment. Creative techniques add emotion and depth to your images, turning snapshots into powerful stories of Iceland’s frozen world.
Use Focus Stacking
 Low light and wide apertures make it challenging to keep an entire ice cave scene sharp. Focus stacking helps you overcome this by combining several images focused at different depths.
Start by focusing on the nearest detail, such as an ice ridge or rock, then adjust your focus gradually toward the background until every area of the frame is covered. Then, blend the shots in post-processing to achieve full clarity from foreground to ceiling. The result is a crisp, detailed image that draws the viewer’s eye through the entire scene.
Include a Person for Scale
 Adding a person to your photo gives it a sense of scale and human connection. The vast chambers of Iceland’s ice caves can be hard to comprehend without a familiar reference point. Request your subject to wear bright or contrasting clothing so they stand out against the blue ice.
If they’re facing the cave entrance, it creates a calm, reflective mood. If they’re exploring or climbing, it adds a spirit of adventure. Experiment with positioning until the composition feels balanced and natural.
Play With Light
 Light shapes the mood of every photograph in an ice cave. Maximize the natural glow streaming from the entrance to highlight textures and curves. If permitted, a headlamp or soft handheld light can reveal hidden layers and enhance color depth.
Try moving your light around to see how reflections shift across the walls; even a soft beam can reveal textures your eyes might not notice. Avoid using intense flashes, as they wash out the ice’s color and remove the beautiful shadows that make your photos come alive.
Look for “Ice Windows” and Natural Frames
 Natural openings in the ice, often called “ice windows,” create powerful frames that guide the viewer’s eye. Start by identifying small arches, carved holes, or thin translucent walls where light passes through.
Position a person, a strong light source, or the cave entrance on the other side to add depth and context to the composition. Experiment with aperture: shooting wide open softens the edges of the frame for a dreamy effect, while stopping down keeps both the frame and background crisp, emphasizing shape and symmetry.
Shoot Reflections in Puddles or Ice Sheets
 Reflections inside ice caves can create dramatic, symmetrical compositions when used intentionally. Look for thin layers of meltwater or smooth ice patches to capture a mirror-like view of the ceiling. Get as low as possible, even placing your camera just above the surface, to maximize symmetry.
If available, use a small reflector to direct gentle light toward the water and strengthen the reflection. This technique transforms simple puddles into striking foreground elements that add balance and depth.
What To Wear for Ice Cave Photography
 When visiting Iceland’s ice caves for photography, especially during winter, having the right gear is essential. Proper clothing keeps you safe in freezing conditions, while the right camera equipment ensures you capture the beauty of the caves.
Here is a list of what to wear for ice caving in Iceland:
-
A thick thermal base layer
-
A heavy fleece mid-layer
-
A down coat top-layer
-
Good quality warm gloves, which will still enable you to operate your camera
-
Water-resistant trousers (preferably thermal)
-
Thermal socks
-
A neck-warmer or scarf
-
An alpine mask to cover your face
-
A good warm hat that covers your ears
-
Waterproof, thermal, knee-high rubber boots
-
Ice spikes or crampons to protect yourself from slipping on icy surfaces
-
Headlamp, as it can get very dark within an ice cave
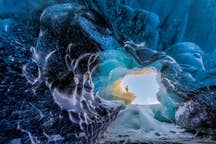
What Are Ice Caves in Iceland?
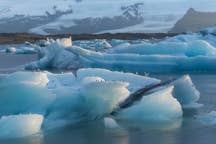
 Ice caves, also called glacier caves, form naturally under Iceland’s glaciers. During summer in Iceland, meltwater flows through the ice, carving tunnels that later freeze solid again as temperatures drop. These chambers become accessible once winter returns and the ice stabilizes.
Because glaciers move and melt continuously, no two caves are the same. Each winter, new passages appear while older ones collapse or shift. The result is a living landscape of glowing blue walls, ash-streaked layers, and glassy textures that change each year, creating ideal conditions for photographers seeking unique images.
Where To Photograph Ice Caves in Iceland
 Because glacier caves are temporary, the most photogenic ones can vary each year. These are the most reliable and visually impressive sites for ice-cave photography.
Katla Ice Cave in Myrdalsjokull Glacier
 The Katla Ice Cave, located under Myrdalsjokull Glacier in South Iceland, is above one of the country’s most active volcanoes. Its walls mix bright blue ice with deep volcanic ash streaks, creating bold contrasts and intricate patterns unique to this region. Photographers can reach this site on a fast-track Katla ice cave tour.
Under the soft winter light, these layers shimmer like marble, making it a dream location for abstract and textural photography. The cave’s proximity to the village of Vik, about 110 miles (186 kilometers) from Reykjavik, makes it ideal for a day trip along the South Coast.
Because Katla’s glacial structure remains more stable than others, it’s often accessible year-round. The cave’s dynamic lighting conditions shift as clouds pass overhead, giving you opportunities to experiment with exposure and contrast.
When you stand near the cave’s mouth and look out toward the snowy plains, you can capture the dark volcanic interior in striking detail. The bright Icelandic sky outside adds contrast and creates a well-balanced, dramatic frame.
Crystal Ice Cave in Vatnajokull Glacier
 The Crystal Ice Cave is Iceland’s most famous and photographed ice cave. It usually forms near Jokulsarlon Glacier Lagoon in South Iceland, about 236 miles (380 kilometers) from Reykjavik.
Inside, you’ll find wide tunnels of translucent blue ice that curve into cathedral-like domes. When sunlight filters through the entrance, the walls glow in rich shades of turquoise and silver, creating natural light that feels almost otherworldly.
The cave is spacious enough for groups, such as those on the Crystal Ice Cave exploration tour of Vatnajokull. Small meltwater streams sometimes run beneath the ice, adding motion and reflection to your photos.
Because the structure changes each year, returning visitors always find something new to frame. Most visitors explore this cave on a glacier caving tour in Vatnajokull.
Skaftafell Ice Caves in the South Coast
 Ice caves in Skaftafell Nature Reserve, also a part of Vatnajokull National Park, showcase Iceland’s quieter, more remote beauty. These smaller chambers often form at the foot of glaciers, surrounded by rugged mountains and frozen rivers.
Sunlight sometimes enters through small cracks or skylights in the ice, creating scattered beams that shift throughout the day, a captivating challenge for photographers seeking subtle light.
Because the caves differ each season, no two visits are ever alike. Some winters reveal narrow passages lined with bubbles frozen mid-motion, while others open into tall chambers framed by icicles and snow arches.
These sites are typically less crowded than Jokulsarlon, allowing more creative freedom and stillness for long exposures. For those wanting both hiking and photography, the Skaftafell ice cave tour and glacier hike provide a combination of adventure and artistry that highlights the quieter side of Iceland’s South Coast.
Langjokull Ice Tunnel
 A Langjokull Ice Tunnel tour in West Iceland gives a rare chance to explore the inside of a glacier year-round. Carved by engineers, this man-made tunnel lets you walk deep beneath the surface of Langjokull Glacier through a maze of ice corridors illuminated by soft LED lighting.
Unlike natural caves that form and collapse each year, the tunnel maintains a consistent structure, making it suitable for all skill levels. A guided Langjokull glacier tour includes explanations of glacier science and safe photo stops where you can capture layers of compacted ice.
The experience contrasts with the wild nature of Vatnajokull and Katla, yet it offers equally mesmerizing photographic potential. You can reach it easily on some Langjokull tours departing from Reykjavik or Husafell.
How To Visit Iceland’s Ice Caves Safely
 Ice cave tours are one of the best winter activities in Iceland. Entering these caves requires a certified guide, as conditions change daily, and professional oversight ensures safety and access. Guided tours also provide essential gear, allowing photographers to focus on capturing the caves’ color, structure, and light.
Suggested Ice Cave Photography Tours in Iceland
-
14-Day Photo Tour: Circle of Iceland with Snaefellsnes and Highlands - Capture Iceland’s most breathtaking landscapes on this 14-day photography journey with expert guides.
-
Private Winter Ice-Caving, Glacier Hiking, and Photoshoot Tour from Jokulsarlon - Participants enjoy a dedicated photoshoot session inside a natural ice cave, perfect for vivid textures and dramatic lighting.
-
Vatnajokull Ice Cave Photography Tour with Local Guide from Jokulsarlon - Led by a local specialist, this experience gives you access to cave formations rarely seen by visitors.
-
Small-Group 3-Hour Ice Cave Tour with Professional Photo Package in Vatnajokull - Learn from photographers as they use low-light and wide-angle techniques while shooting inside the glacier.
-
8-Day Photo Tour: South Coast and Golden Circle - Capture Iceland’s south coast and Golden Circle highlights on an 8-day photography adventure with expert guides.
Your Guide To Photographing Ice Caves in Iceland
 Photographing ice caves in Iceland is a wonderful experience. These natural wonders are constantly evolving, presenting unique patterns, colors, and formations each year. With the camera settings, gear, and creative techniques, you can take images that represent the beauty of these frozen wonders.
To experience them safely, consider joining an ice-cave photography tour led by local experts. They know the conditions, provide the necessary equipment, and help you find the best perspectives.
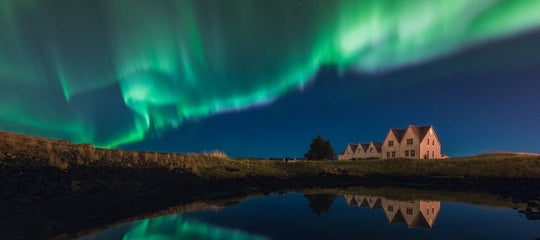
Many tours combine ice caves with winter highlights like waterfalls and the northern lights, giving you plenty of variety in one trip. For a longer option, you can join an 11-day winter photography tour of Iceland’s Ring Road to capture an even wider range of scenes.
Do I need a guide to visit an ice cave in Iceland?
What kind of camera equipment works best inside an ice cave?
Which camera settings are useful when shooting ice-cave scenes?
- Aperture between f/9 and f/13 for deep focus, or wider (f/4–f/5.6) in darker spots
- ISO 200–800 to reduce noise
- Shutter speed between 1–6 seconds with a tripod
- Auto white balance if shooting RAW
- Manual focus placed about one-third into the frame works well, and image stabilization should be turned off when using a tripod.
What can I do to make my ice-cave photos more creative and interesting?
Can I photograph ice caves without a tripod?
Are ice caves bright enough for photography?
Can beginners photograph ice caves successfully?
Can I fly a drone during an Iceland ice cave tour?
Can I combine ice-cave photography with the northern lights?
Are Iceland’s ice caves the same every year?
We hope this ultimate guide to photographing ice caves in Iceland has inspired you to start planning your adventure. Have you photographed an ice cave before, or is it on your bucket list? Share your thoughts in the comments below!

I’m Rebecca, Head of Content at Guide to Iceland. I’ve lived in Reykjavík for almost a decade and have traveled across the country in every season. I care about making travel information easy to find, accurate, and genuinely helpful.